

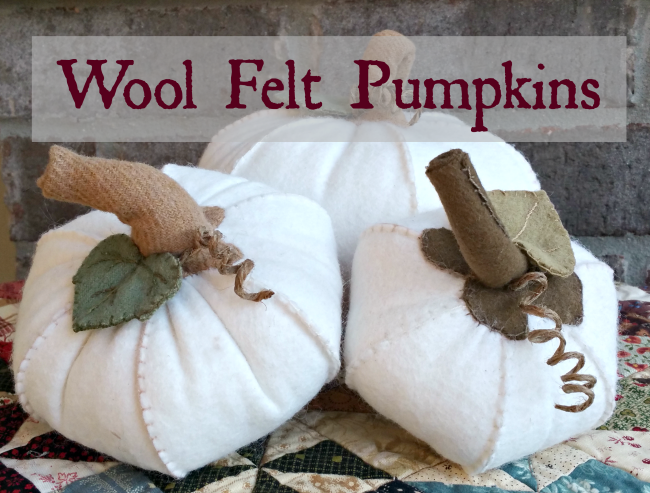
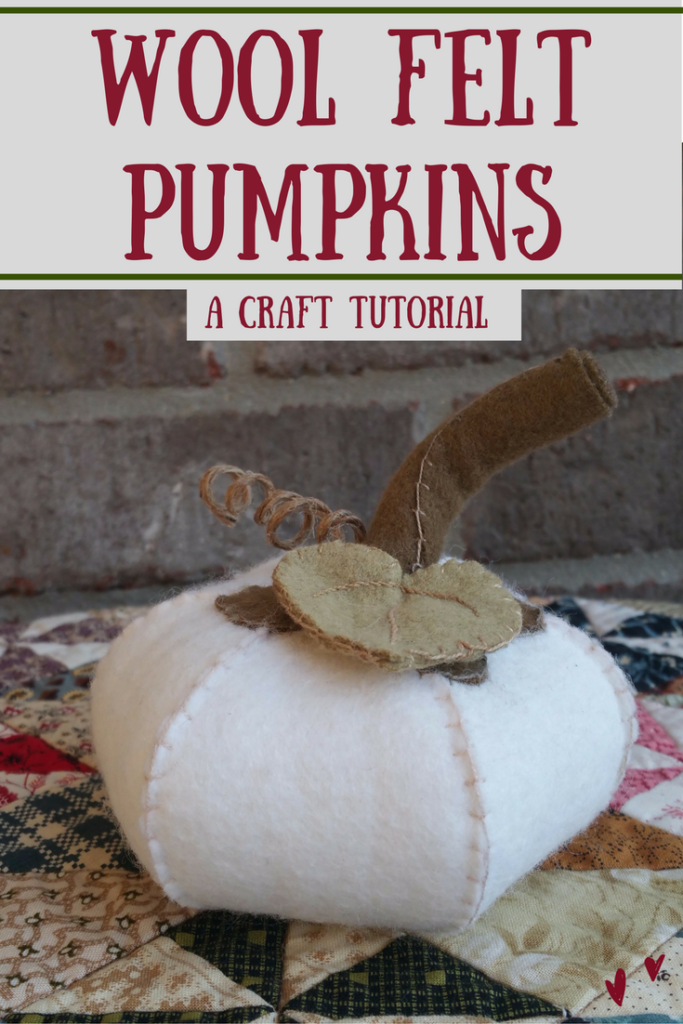
Hello, Pumpkin!
Welcome to my first “Let’s Get Crafty” tutorial.
These wool felt pumpkins are quick and easy (and BEYOND adorable) but have great detail to take them a step above the “gathered fabric circle” pumpkin.
(Those are totally cute, too. No judgement zone, remember!)
I love working with wool.
The edges don’t fray, it looks beautiful embroidered, and it’s easy to work with even if your pieces aren’t perfectly cut.
Some of the steps can even be done with a hot glue gun!
Yup…I said it.
Grab a cup of your favorite crafting beverage. (PACE yourself! I don’t want to be held responsible for any crafting accidents!)
Ok…now I’m nervous! AHHHH!!!!
Let’s Get CRAFTY!
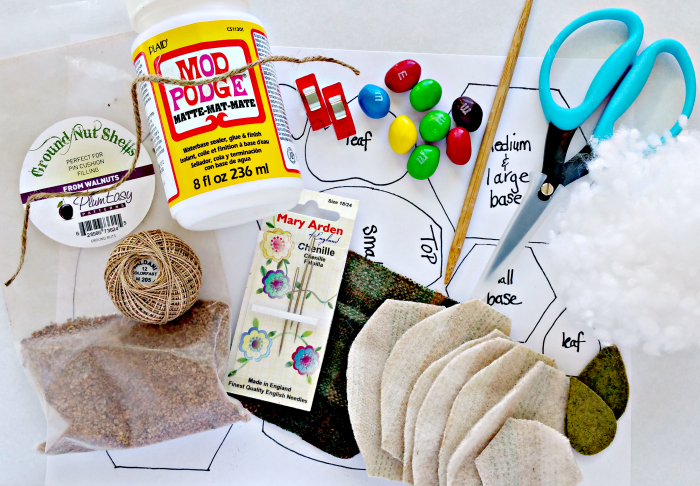
Supply List
(ALL recommendations are what I use, love, and would buy you if you came over for a craft-a-thon.)
Print this: pumpkin-template
Wool Felt– I order my wool felt from Nutmeg Hare and Three Sheep Studio. They both carry great textured hand dyed wool.
All sizes are approx. It will depend on how full you stuff your pumpkin
Small Pumpkin: (finished size 4 inches wide)
8 inch square- for body of pumpkin
4 inch squares for stem and leaf
Medium Pumpkin: (finished size 5 inches wide)
10 inch square- for body
4 inch squares for stem and leaf
Large Pumpkin: (finished size 7 inches wide)
12×14 inch rectangle- for body
5 inch square for stem
4 inch square for leaf
Muslin – (or any piece of ugly fabric you have that you don’t want to look at )
You will make a mini “bean bag” that holds the crushed walnuts or doll pellets inside the pumpkin.
For the small pumpkin you need a 2.5×4.5 inch rectangle
Medium or Large Pumpkin you will need a 3×6 inch rectangle
Bag of crushed walnuts or doll pellets
I bought mine from Amazon because one of my major goals in life is to find ways to NEVER have to leave my house!
(Joann’s, Michaels, or your local quilt store may have them, also.)
Here’s the link for the crushed walnuts or doll pellets if you like buying things in your jammies (or loungewear IF you have lipgloss on).
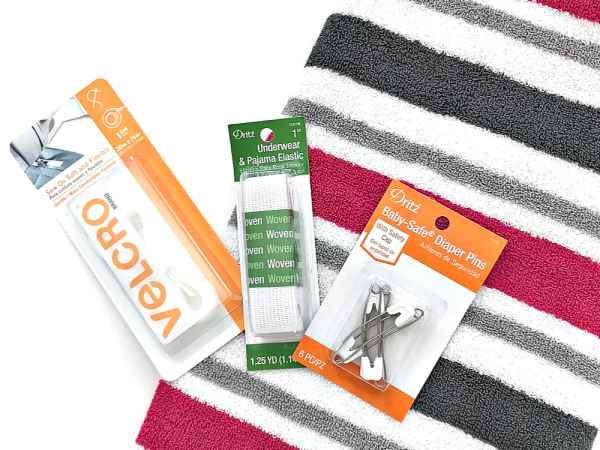
Needles– I use Mary Arden Chenille needles. You need a needle with a large eye.
Embroidery Floss- I use Valdani size 12. Size 12 is the “weight” of the thread (how thick the thread is). If you don’t have that “weight” you can use 2 or 3 strands of a DMC floss.
Thread– You will need an all purpose thread to attach the jute coil and to stitch the wire to the wool felt square.
Wire– I used a 24 gauge florist wire because that’s what I had.
Any wire will work as long as you can bend it.
Small Pumpkin- bend a 6 inch piece in half and twist
Medium and Large Pumpkin- bend an 8 inch piece in half and twist
Scissors– Any sharp scissors will work.
I have a pair of Karen Kay Buckley Perfect Scissors. I LOVE them…They cut wool beautifully!
Stuffing– any fiberfill stuffing will work.
Optional:
10 inch piece of Jute Twine, Mod Podge (or Elmers Glue), and a chopstick (or pen) to wrap the twine around.
Hot Glue Gun- I will let you know when you can “choose your own adventure” and use hot glue instead of sewing.
Now for the “Deets”
(That’s how the kids say the word Details these days…I’m so hip and with it!)
Step 1. (optional)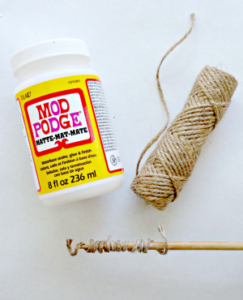
Jute Coil– Dip your fingers (or the jute twine) in Mod Podge and cover the twine or run a bead of glue down the length.
Make sure the twine gets coated with glue but NOT dripping.
Wrap the twine around a chopstick or pen and hold it for a few seconds.
Gently slide the twine off and lay it down on a piece of parchment to dry.
Step 2.
 Muslin “bean bag”
I like to call this step “All about the Bass”…no Treble (I dare you to NOT start singing that Meghan Trainor song)
You can sew OR use your glue gun for this step.
Fold your rectangle in half to make a square.
Sew down the left and right side (or glue down) leaving the top open.
If you choose to sew the sides, turn your square right side out after stitching to enclose the seams.
Fill approx 2/3rds full of either pellets or crushed walnut shells.
Glue the opening closed OR turn the edges down a quarter-inch and topstitch closed.
For the Pumpkin
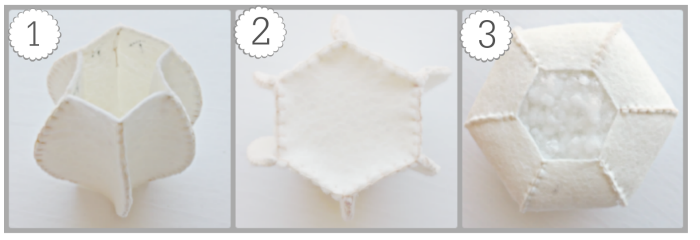
1. The body
Cut out the body and base template for the pumpkin you would like to make. (The Medium and Large Pumpkin use the same base)
Trace 1 Base and 6 body pieces onto your wool felt.
Make sure to label the top of each body piece. (Narrower end)
Sew 2 bodies together on one side using a buttonhole stitch.
(If you aren’t familiar with the buttonhole embroidery stitch, watch this tutorial and try not to laugh at me explaining it!)
Repeat for a total of 3 pairs.
Sew 2 pairs together on one side ( it will look like a “chain” of pumpkin slices) and sew both sides of the last pair to enclose the pumpkin body.
2. The Base
Stitch the hexagon base to the body of the pumpkin using the same buttonhole stitch.
3. Fill ‘er Up
Drop your muslin “bean bag” inside your pumpkin and stuff with fiberfill.
 4. Gather the top
Re-thread your needle and tie a large knot.
Draw your thread through from the inside (to hide the knot) and take large stitches (basting stitches) about 1/4 inch from edge all the way around the pumpkin.
Pull the thread gently to draw in the top and give the pumpkin some dimension.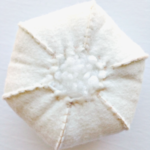
Secure with a knot on the inside of the pumpkin.
The Stem
Take your twisted piece of wire and lay it approx 1/4 inch from one edge of your wool stem square.
Fold edge of wool over the wire.
Hot glue or stitch wool to secure the wire.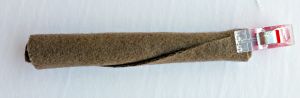
(If you are a visual learner, you can watch me attach the wire to my wool felt square in this tutorial.)
Once your wire is secured, roll your wool square tightly to create the spiral.
(Think Pumpkin Roll with cream cheese frosting in the middle. Great! Now I’m hungry!)
Hot glue or embroider the seam stopping 1-2 inches before the wider end. (Here I am demonstrating this step.)
Now comes the “tricky” part.
You want to UN-roll the wider end of your wool stem to reveal the innermost roll.
Trim that away to the wire WITHOUT cutting the wire itself.
Once that excess is trimmed away, you’ll be able to spread out the base of the stem to attach it to the pumpkin body.
 I made a few slits in the wool to spread out the stem even wider and cut curves to make it look more natural.
Stitch the base of the stem to the pumpkin over the hole.
Now comes the FUN part!
Accessories!!!
Jute Coil– (optional)
If you made a little curly coil, you can secure it to the wool stem with hot glue or a few stitches through the twine and into the stem.
Leaf-
Hot glue-
If you’re using hot glue, you only need 1 leaf.
Dab a bit of hot glue to the middle of the wider end leaf and pinch together to create a little pucker.
Hot glue the back side to your Pumpkin Stem.
Embroidery-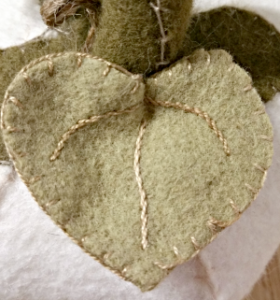
I used an embroidery stitch called the “Stem Stitch” on one of the leaves to create the veins.
I used the buttonhole stitch to secure the front and back leaf together.
Fold the leaf in half and run a few stitches through all the layers toward the base of the leaf to create the pucker.
Stitch the leaf to your Pumpkin Stem.
Now comes the important part!
Bask in the glory of your craftiness!!
You did it!!!
Take a pic and let me see!
Follow me over on Instagram to see ways to customize your pumpkin for a hostess gift, birthday present, or to keep for your very own and not share with ANYBODY!
How about inviting some friends over for a girls night and get crafty!
Pajamas, frosty beverage, Peanut M&M’s, hot glue, and needles!
Go be Craft-astic, friends!

YAY! Thanks for sharing this Rebecca! I love the details of the wool, the buttonhole stitch, the crushed nuts or doll pellets, the stem and leaf … they all make these the cutest fabric pumpkins! I can’t wait to get started on my own little pumpkin patch
I hope you love making these, Beth! They were lots of fun to create!
These are SO stinkin’ CUTE!!!!! I need to try my hand at making my own pumpkin patch of felted “Punkins”! ?? Pinned!!?
They are a ton of fun, Sarah. You could make them in your favorite color! White pumpkins for the Win!